Features | Open Source | Releases | Docs | Try us free | Blog | Product
Getting Started OLD (with onesait Platform CloudLab)
In this guide, we are using onesait Platform CloudLab. This is a free installation of the platform offered in Cloud, where platform developers and potential users can probe the platform.
Access CloudLab
The main access is onesait Platform CloudLab: https://lab.onesaitplatform.com
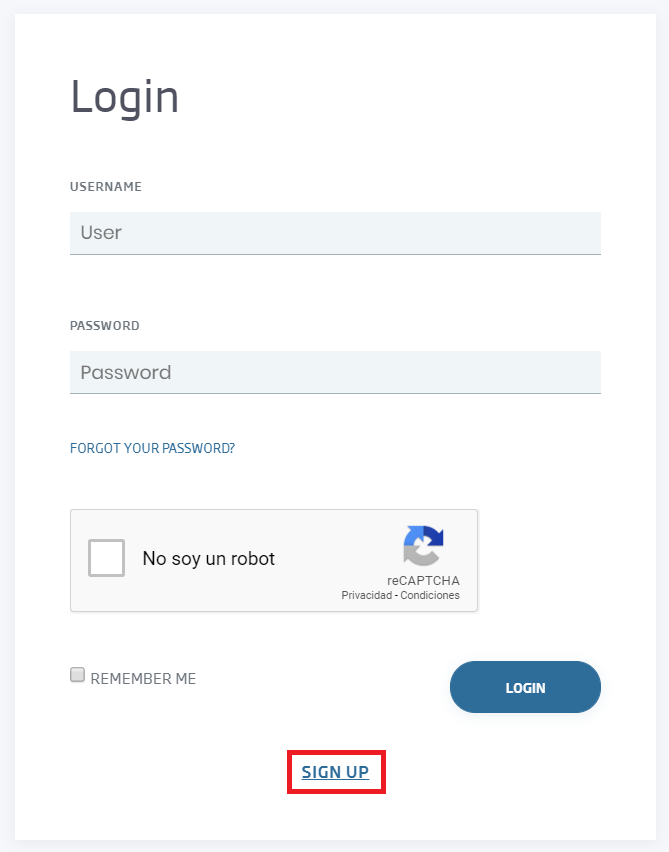
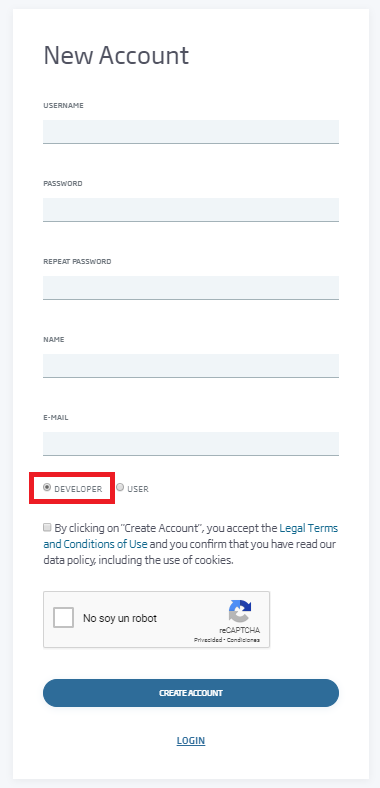
Firstly, you must create a User. To do it, on the login page, select Sign Up and enter your id, password, name and e-mail address to access the platform. If you want to access the platform as a developer, you should select Developer role:
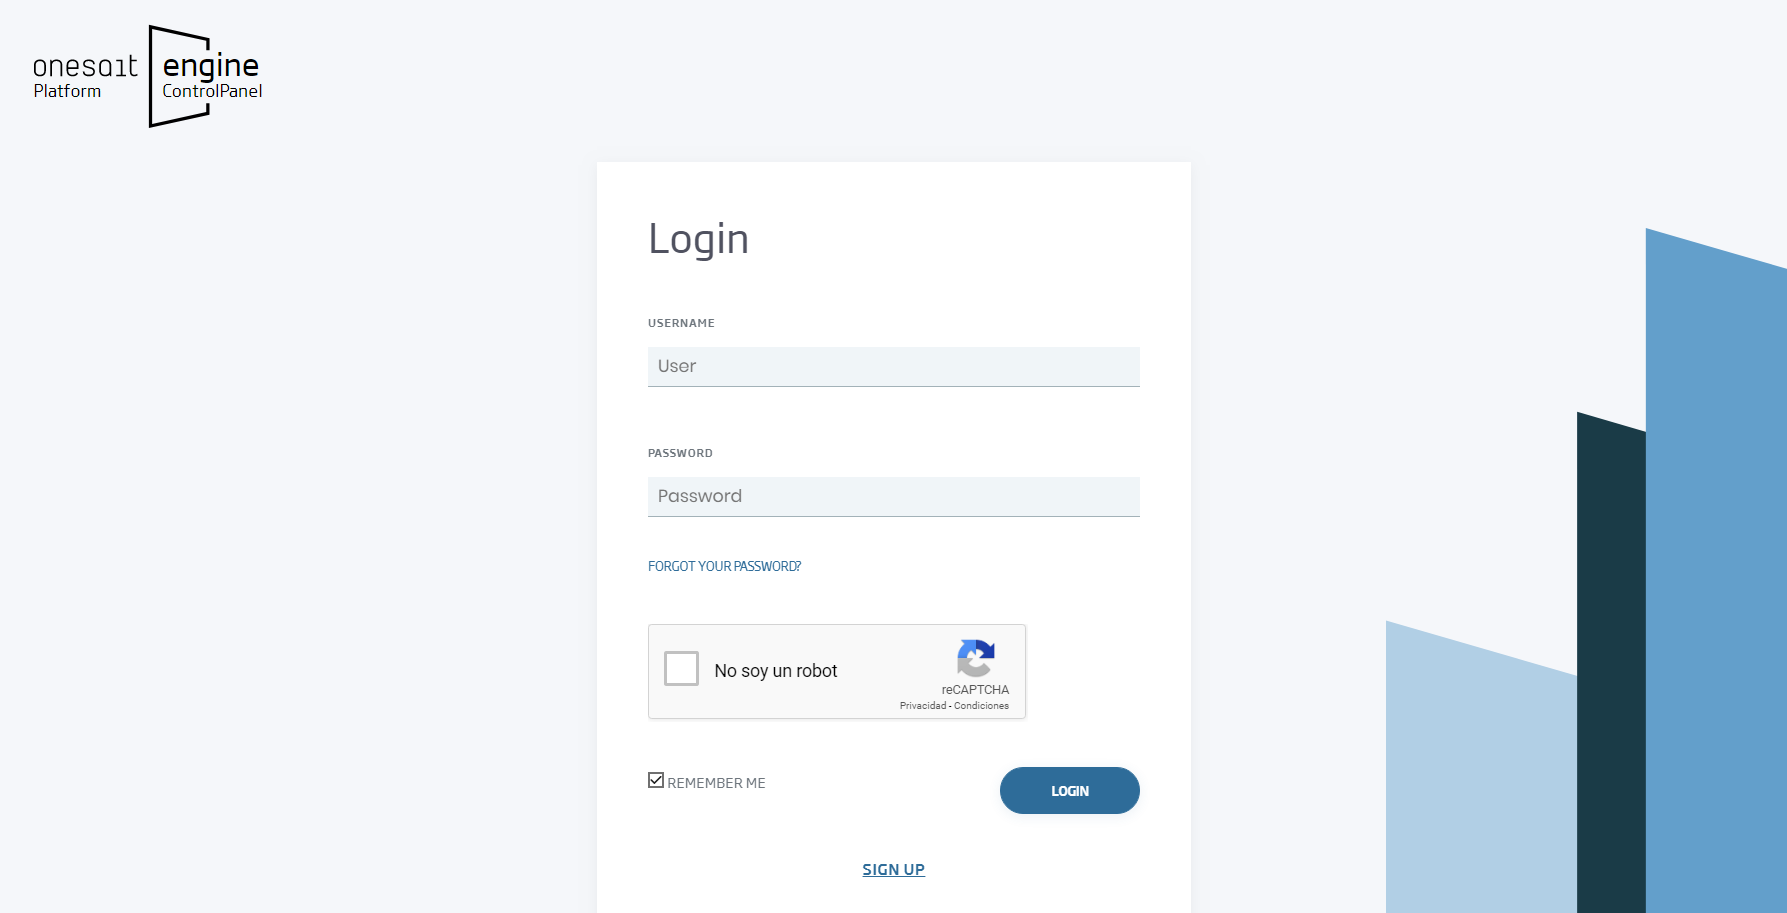
Once you have created the account, you can access with your user and password:
Main Page
When you access the Control Panel with the developer role, you will see a page like this:
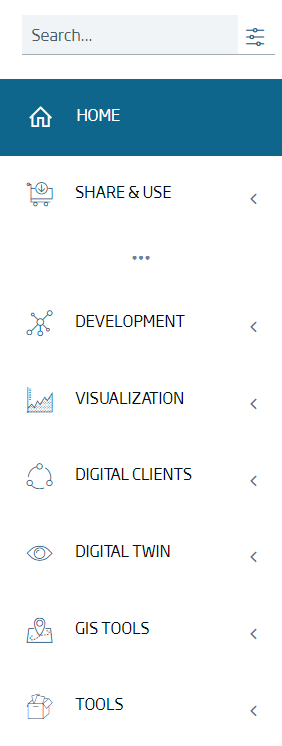
The main page shows you:
- A menu, in the left side, with all the options of the platform. It is organized in submenus: SHARE & USE, DEVELOPMENT, VISUALIZATION, DEVICES, DIGITAL TWIN and TOOLS.
- A header where you can view your token, access your profile, select the language of the application and log out of the system:

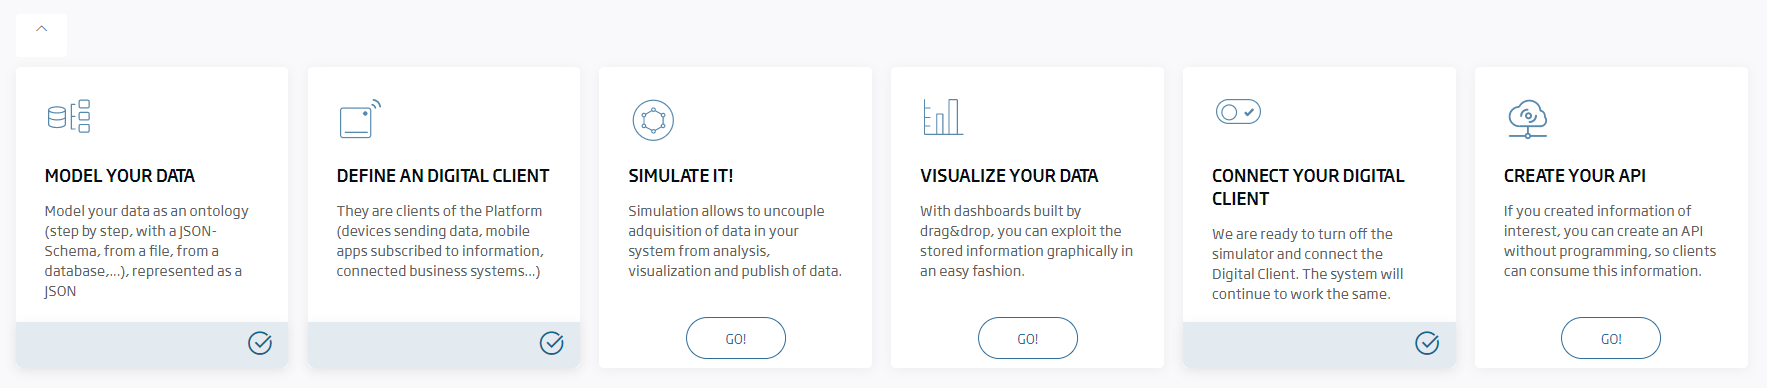
- A first widget that shows you the typical flow to create apps with the platform. Each box gives and describes one action.
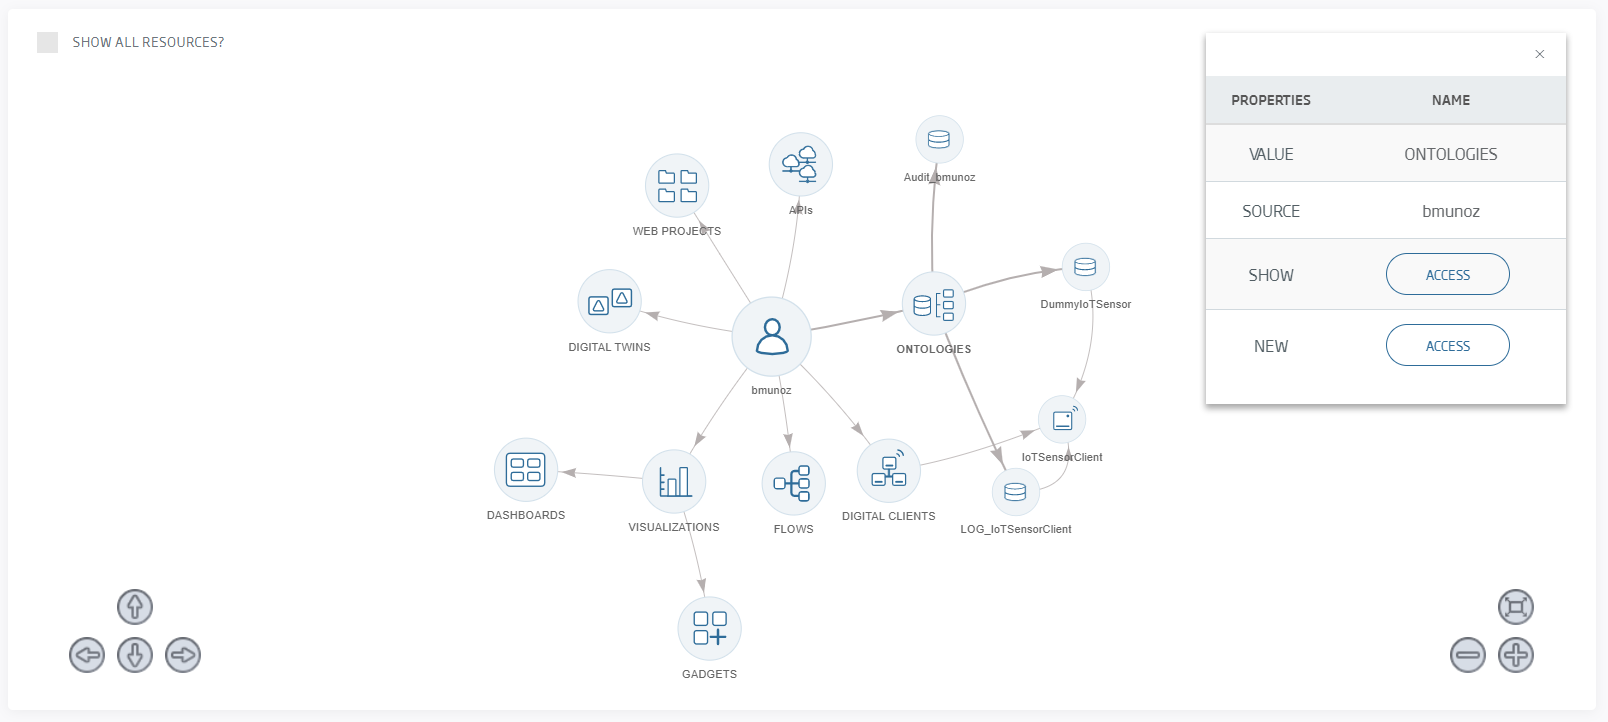
- A second widget showing a graph of the components available for the user. As some users have created public ontologies, you can access these:
Creating an Ontology
The first step is to model the data that we want to use. To do that, go to the menu option DEVELOPMENT -> My Ontologies
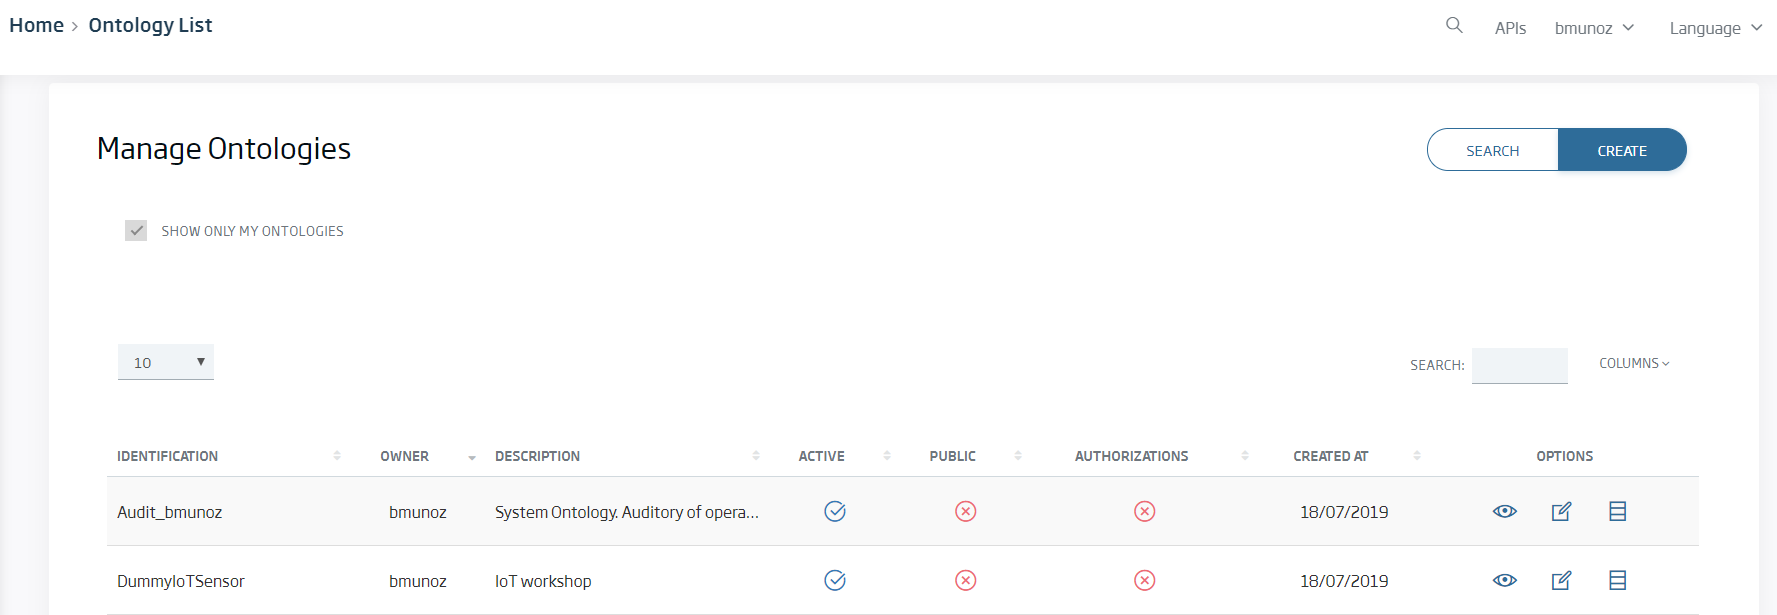
This option shows the available ontologies. Use the Create option, at the right upper corner, to create a new Ontology.
An Ontology represents your data's data model.
Complete the following information for your new Ontology:

- Name: provide a unique name of the Ontology. For example Temperature_newuser_1
- Meta-Information: insert keywords to classify Ontologies. Use commas to introduce several keywords.
- Active: indicate whether the Ontology is active or not. Inactive Ontologies cannot be used.
- Public: indicate whether the Ontology is public or not. All users will be able to query the data that is stored in the public Ontologies.
- Description: provide a description that helps identify the goal of the Ontology.
- Ontology Template: select one of the available templates to create the ontology. The most basic template is General -> EmptyBase. After selecting the template, add all the properties that you need in the ontology using the ADD NEW PROPERTY button.
When you finish adding properties, use UPDATE SCHEMA to add all the new properties to the Ontology. This shows the internal schema of the Ontology. The platform validates all messages of this type with this schema:

Finally, save the Ontology using the New Button at the end of the page:
Creating an Digital Client for the ontology
After defining the ontology, you can define Digital Clients that work with that ontology.
An Digital Client is the representation of a physical device or system that is connected to the platform.
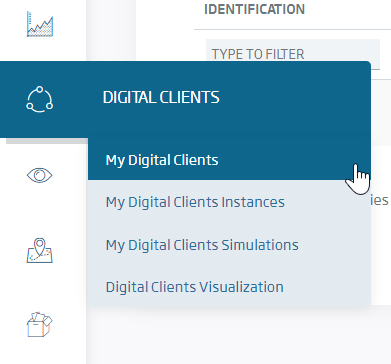
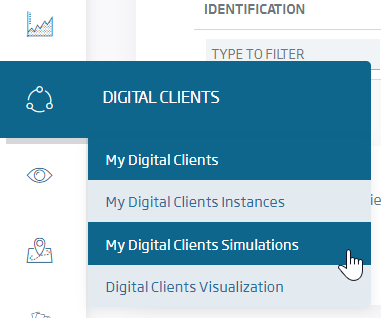
These devices will generate and/or consume data. To create one of these, go to the Digital Clients-> My Digital Clients menu option.
Use the Create button to define a new Digital Client.
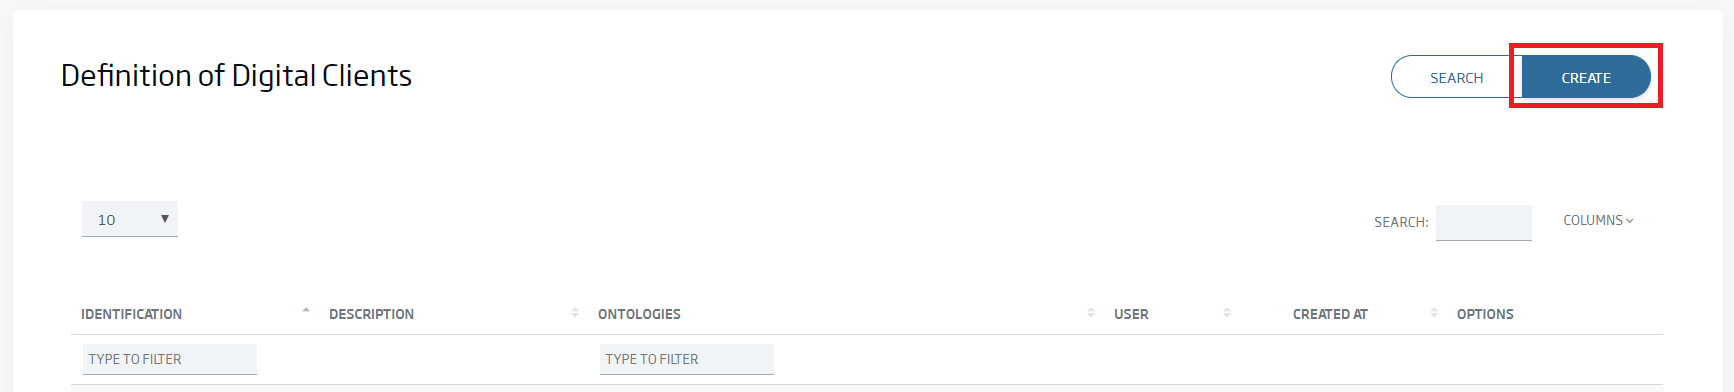
Complete the following information for the new Digital Client:
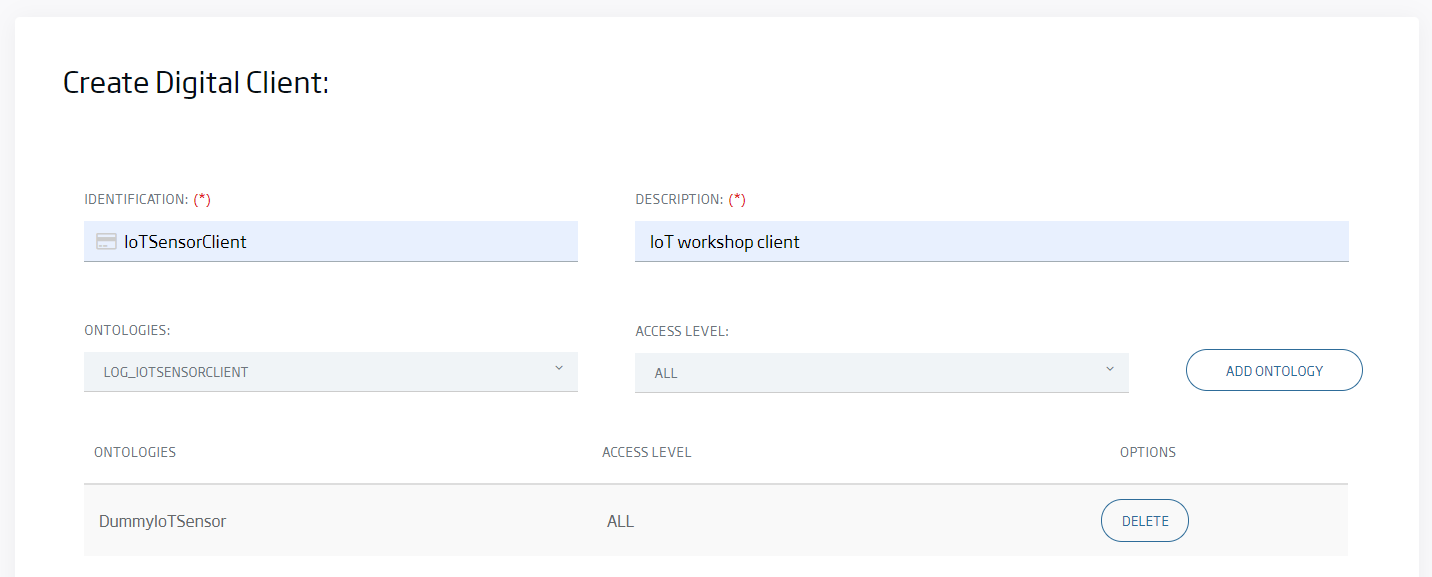
- Identification: provide a unique name for the Device. For example Thermometer_newuser_1
- Description: add a description for the Device.
- Ontologies: You can configure access to several ontologies. In this case, we select the previously created ontology Temperature_newuser_1
- Ontology: ontology identification.
- Access Level: the configured access type.
- Meta Information: Additional information about the device. The information will be added as key-value pairs.
- name: key name.
- value: property value.
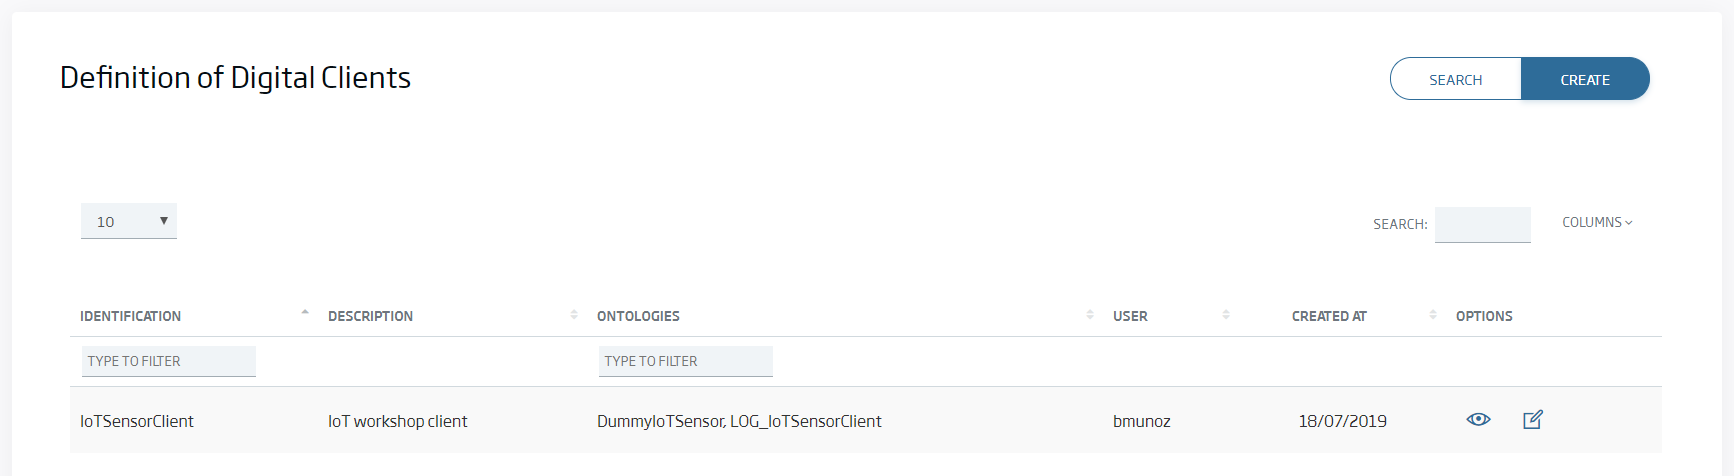
Now you can save your Device with New button. In the list of Devices, you can view:
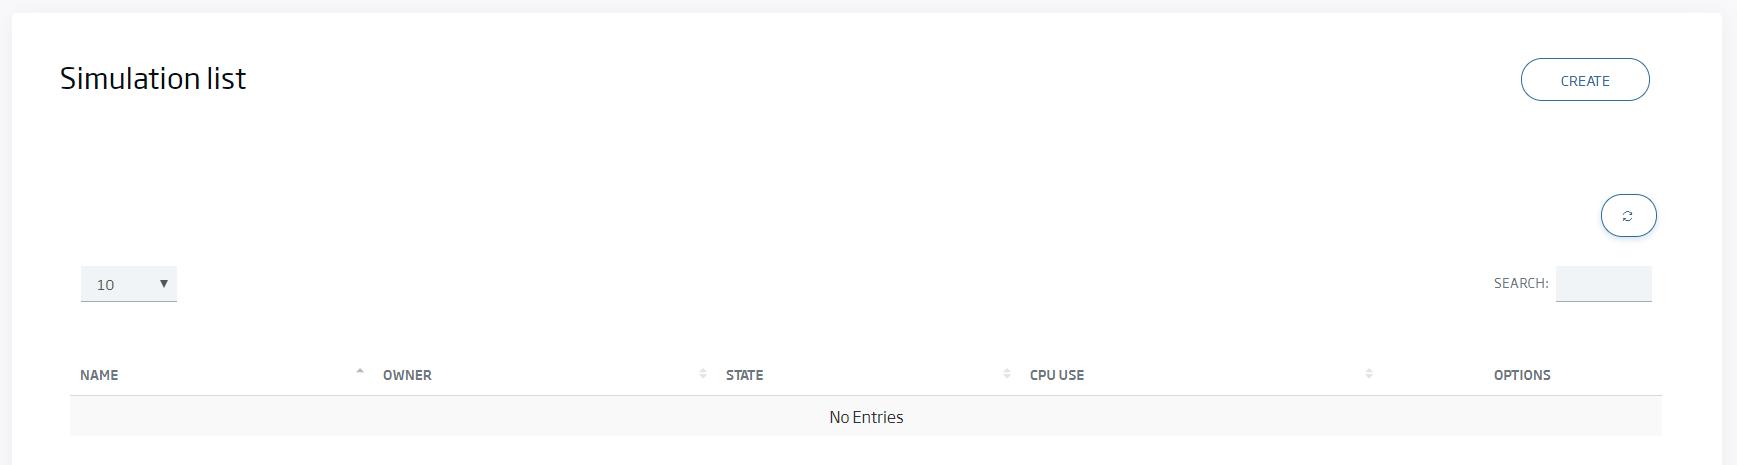
Creating a Simulator for the Digital Client
It is possible to define Device Simulators. This concept simulates a device sending information (Ontology instances) to the platform.
To do that, go to the Digital Clients-> My Digital Clients Simulations menu option and use the Create button, in the right upper corner, to define a new Simulator.
Complete the following information for the new Device Simulator:
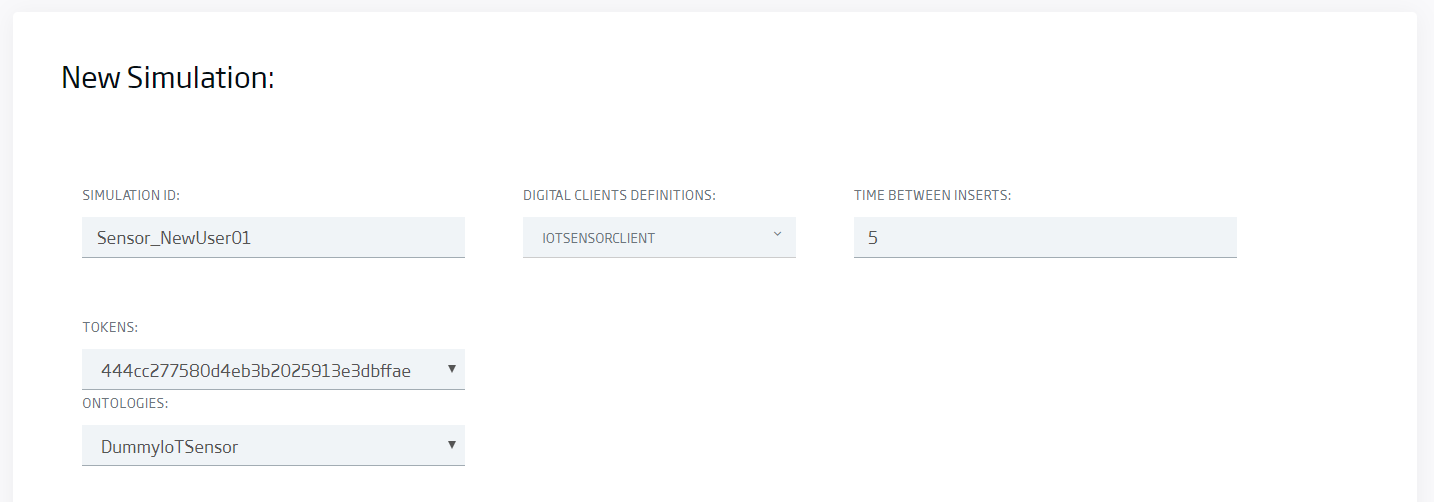
- Simulation ID
- Digital Cliente Definition: select onee from your Digital Clients.
- Token: choose one of the tokens that are defined in the Digital Client.
- Ontology: choose one of the ontologies in which the device has insert authorization. In this case, Temperature_newuser_1
- Time between inserts: indicate the time in seconds between each insert in the ontology. For example, 3.
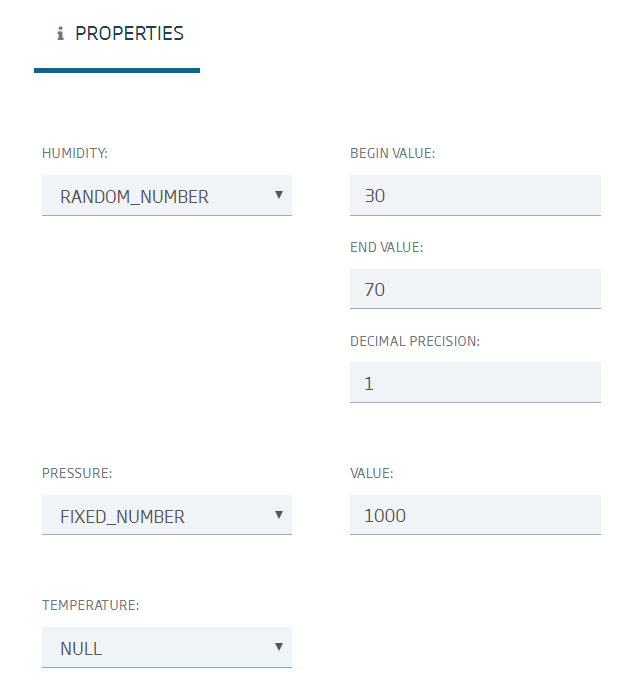
- Ontology Properties: fill in the required information to generate values for each field in the ontology.
Finally, save the simulator using the New button:
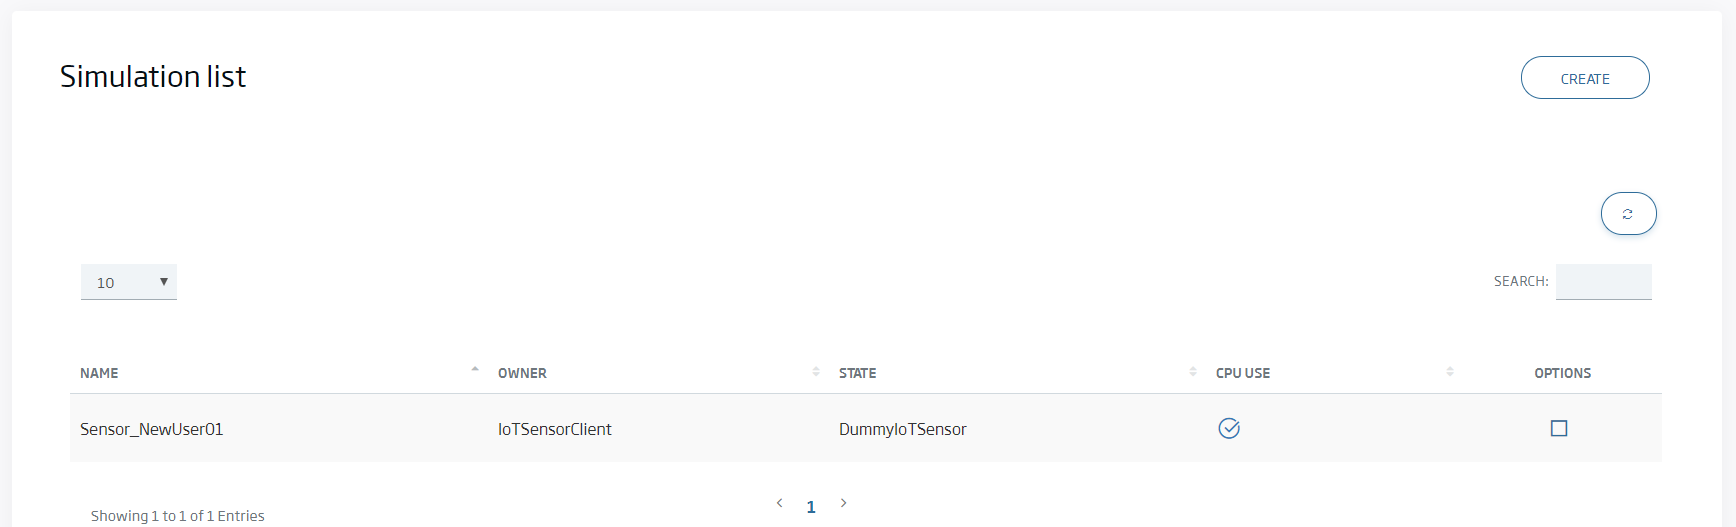
When you have created the simulator, it automatically starts generating data, as you can see in the list.
You can stop in the STOP button and then you´ll see:

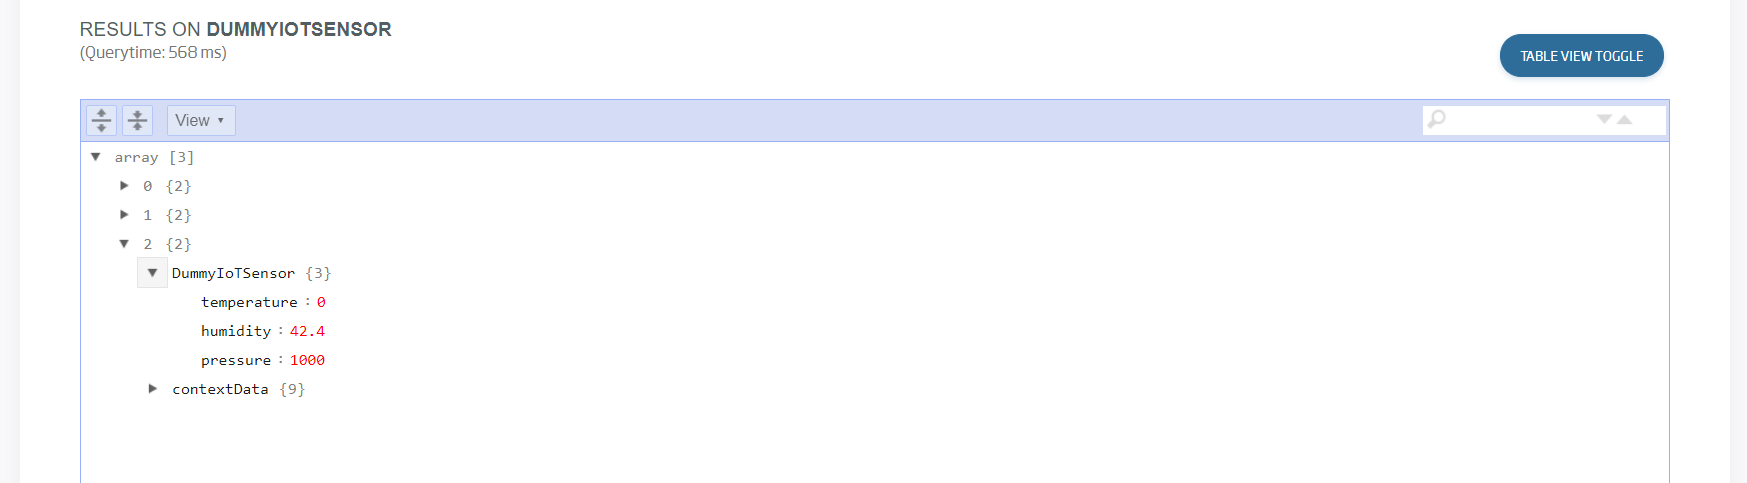
To verify that the simulated device has inserted instances of the defined ontology, we can go to the menu TOOLS -> Query Tools and select our ontology:
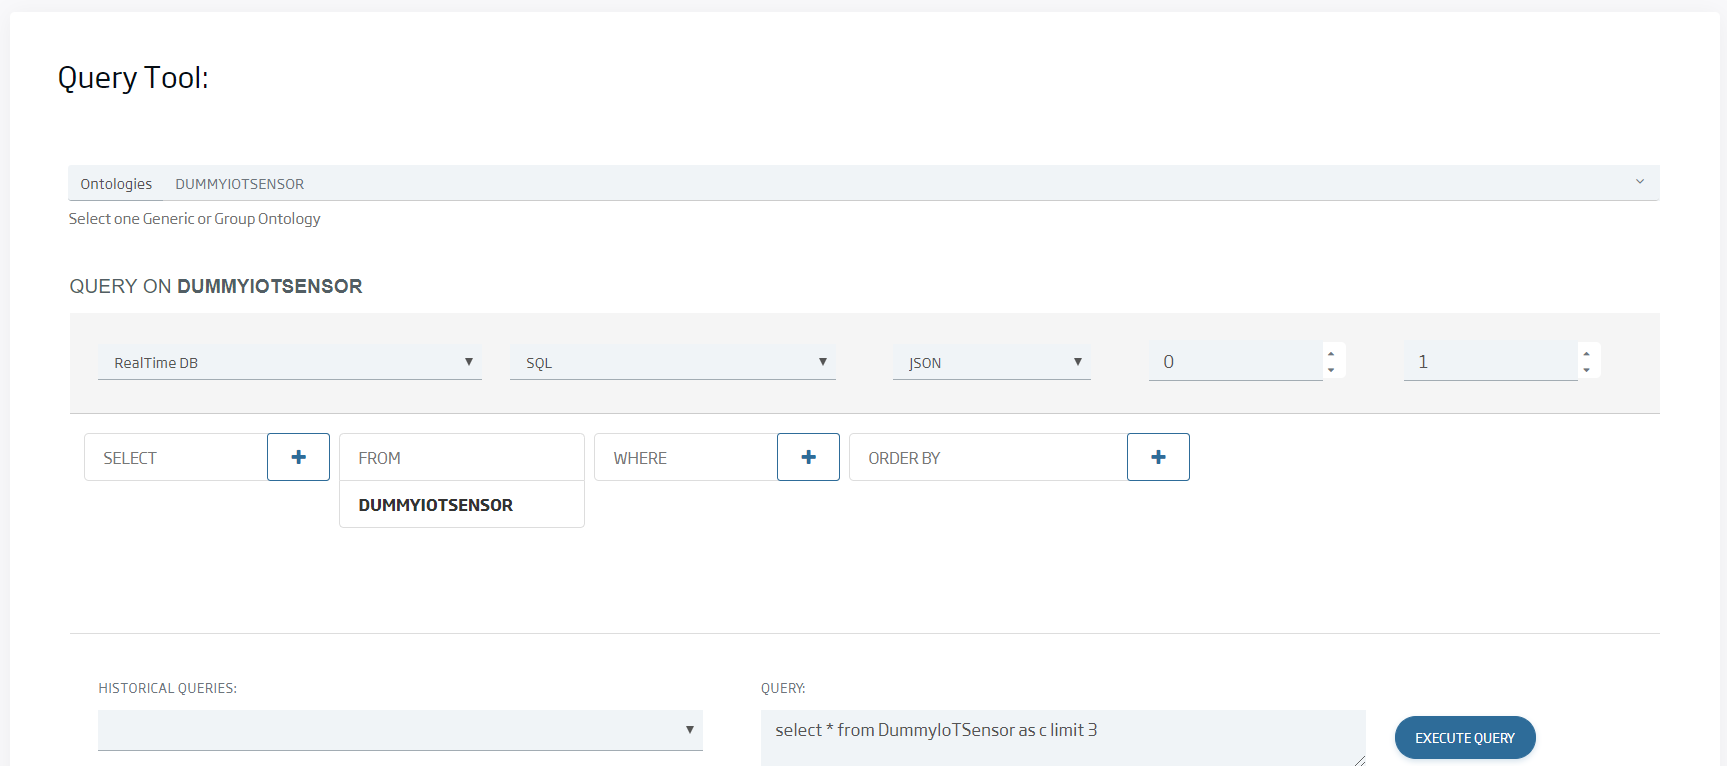
When we pulse the Execute Query button, we can see some instances of my ontology:
Creating an API REST to publish the ontology
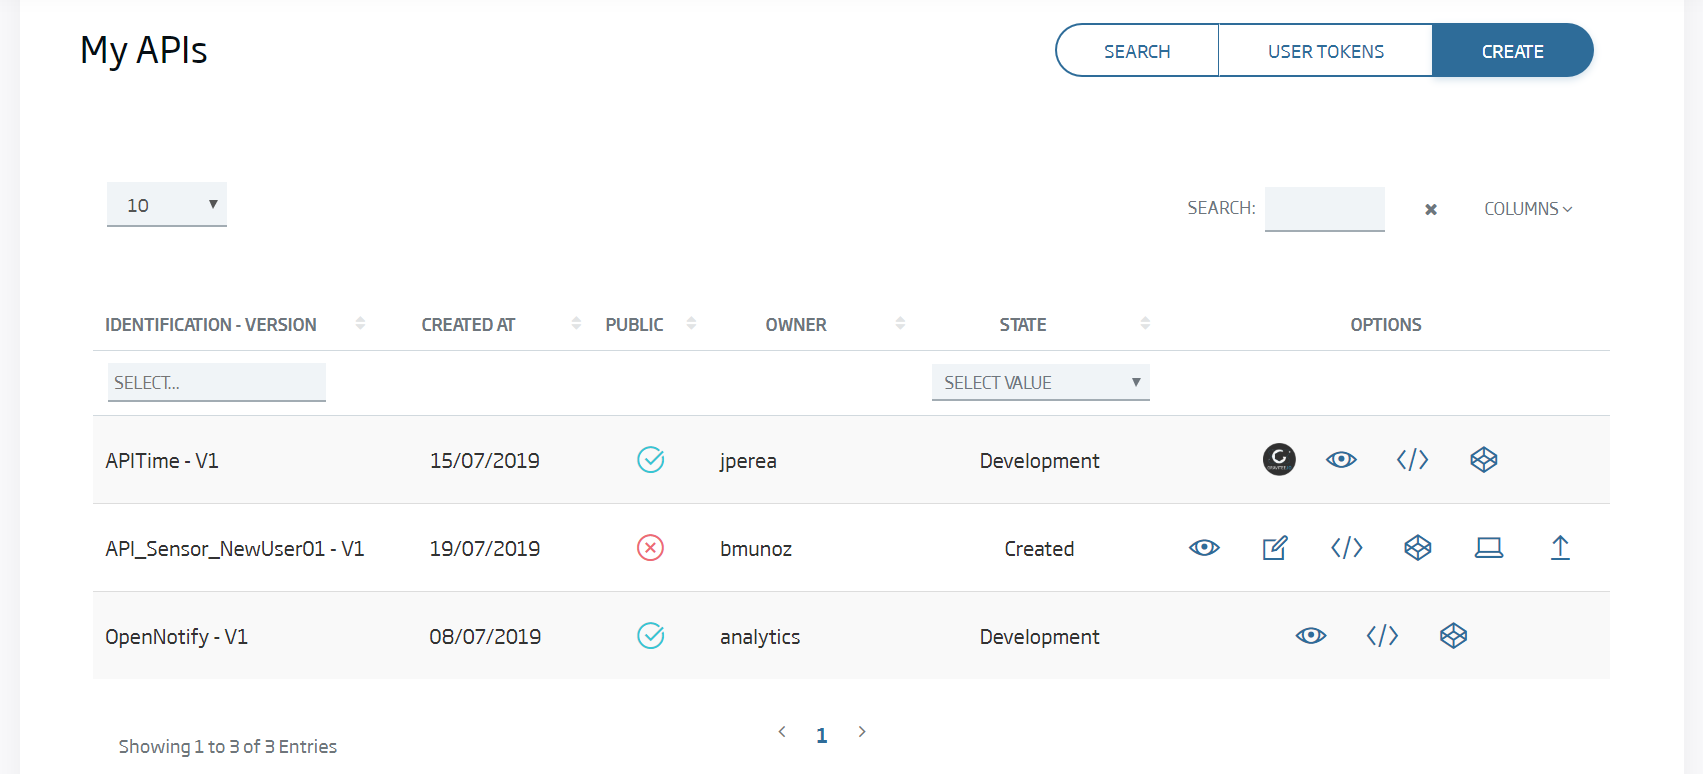
You can publish operations over your Ontologies using creating REST APIs. In order to create an API, go to the menu back to the Control Panel web application and use the DEVELOPMENT -> My APIS menu option.
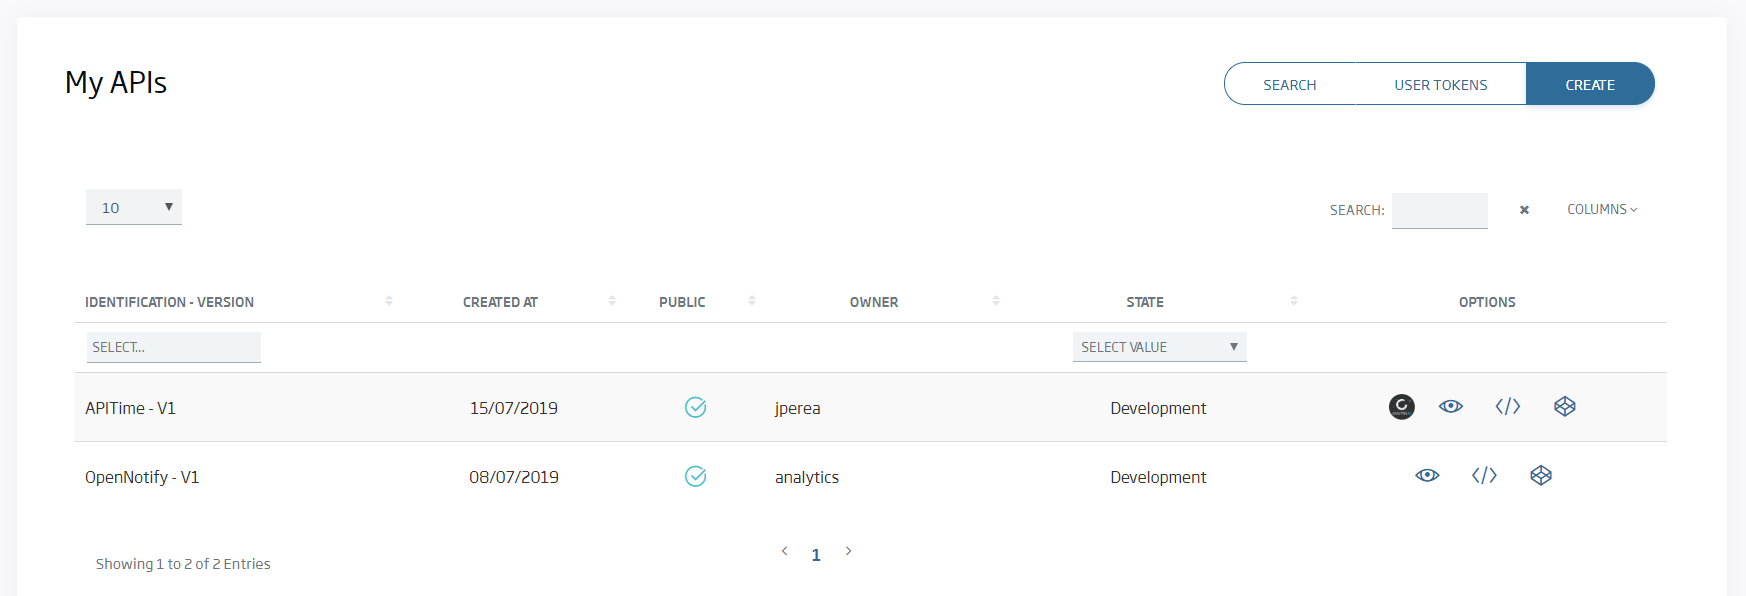
In the list, you can see APIs published as Public for other users.
Use the Create button. You must provide some information to create the API:
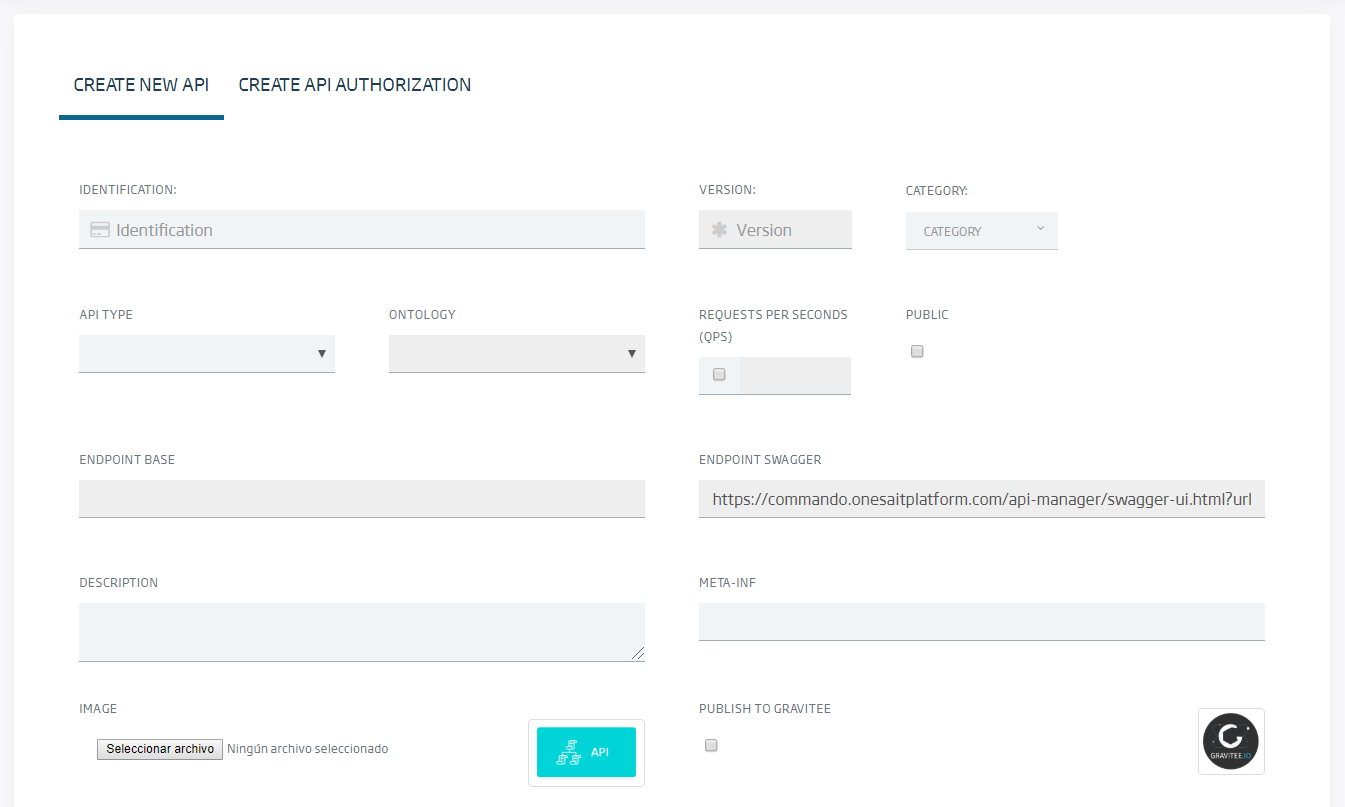
- Identification: select a unique name for your API. For example APITemperature_newuser_1
- API type: currently the only available option is: expose an Ontology as API REST.
- Ontology: choose the Ontology used in the API. In our case Temperature_newuser_1.
- Description: provide a description for the API.
- Category: choose the category that better matches your API.
- Public: if marked, this API will be visible for all the users and all the users will be able to use it.
- Meta-inf: provide the meta information that you want for your API.
- Image: if you want to use an image for your API.
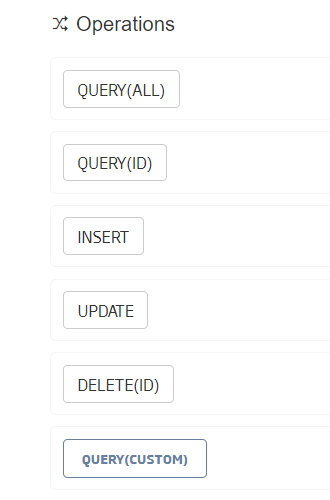
After these steps, you see Operations, then you must choose the operations that you want to expose in your API. There are several pre-created operations. Additionally, you can provide any other operation based on queries.
- QUERY(ID): if selected, it allows using get data by id operation from the Ontology.
- INSERT: if selected, it allows performing insert operations to the Ontology.
- UPDATE: if selected, it allows performing update operations to the Ontology.
- DELETE(ID): if selected, it allows performing delete operations by the id of the data stored in the Ontology.
- QUERY CUSTOM: this option allows defining all the required operations that could be required based on database queries. For example, you can select it and complete this information:
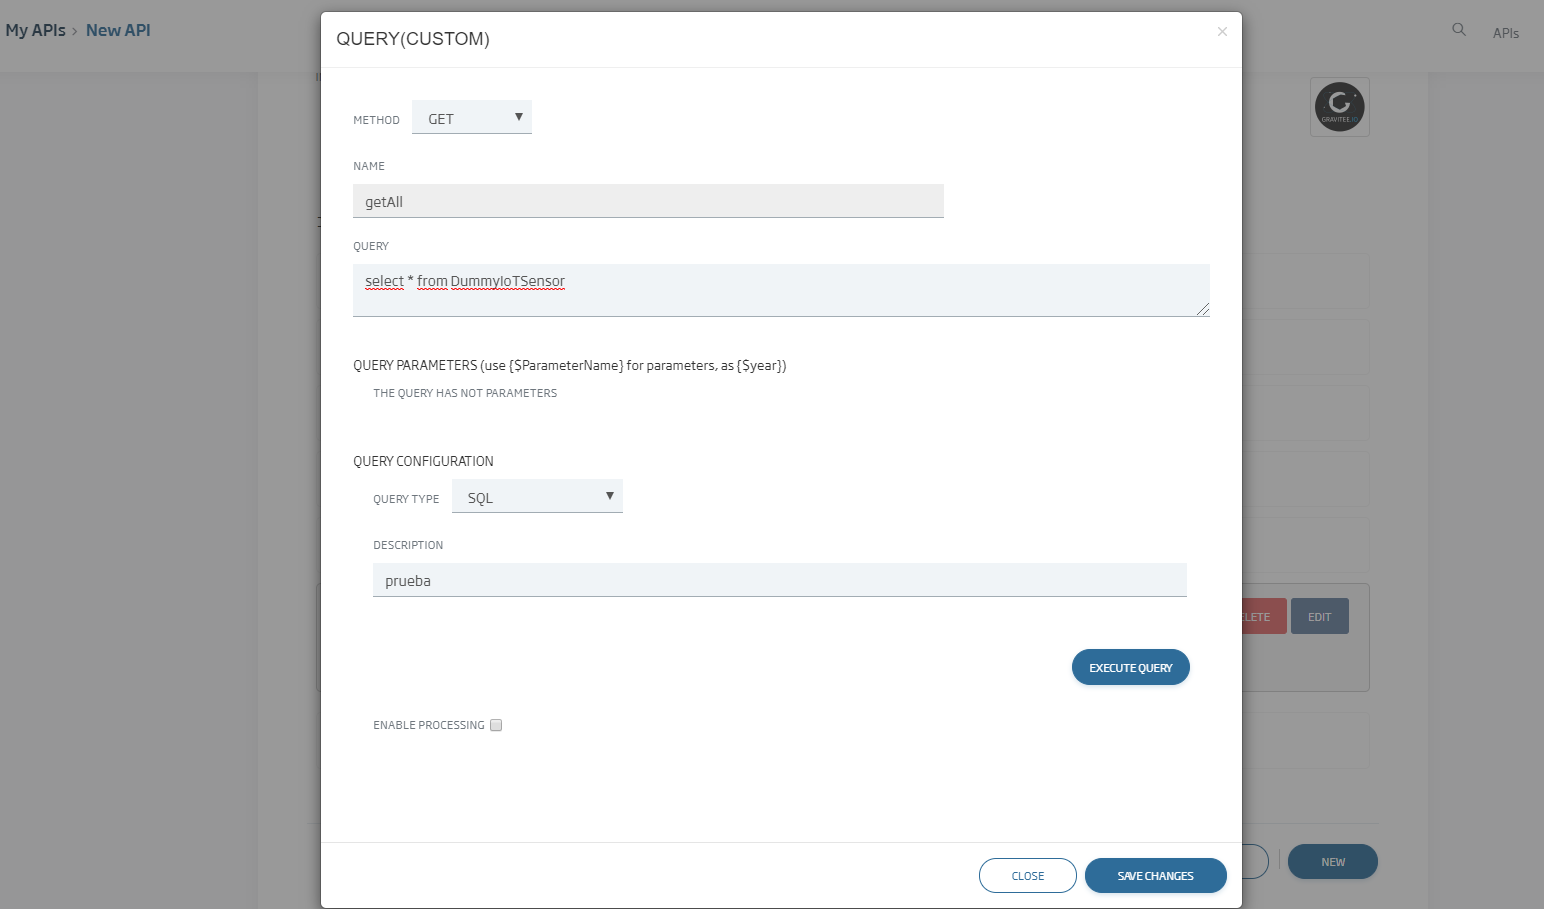
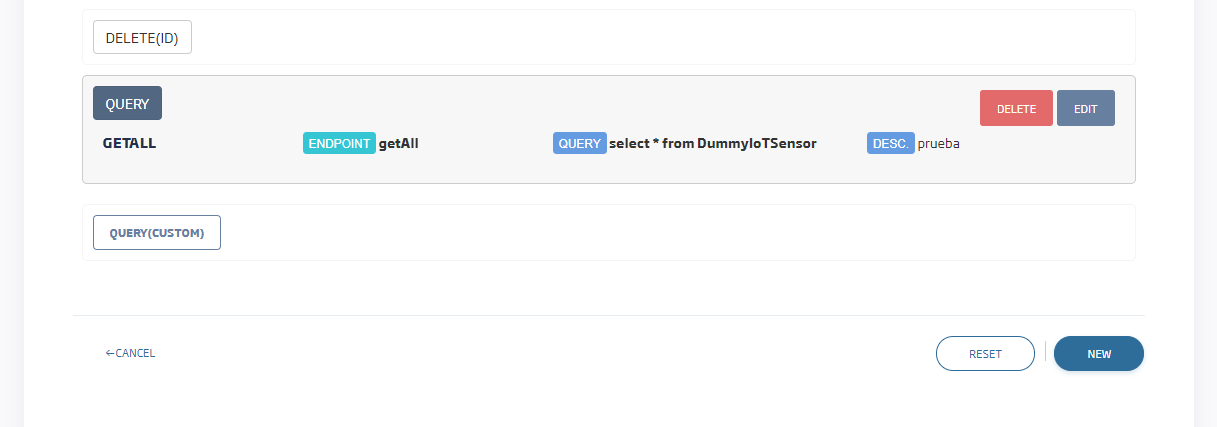
Then select Save Changes.
Finally, use the New button to save the API data:
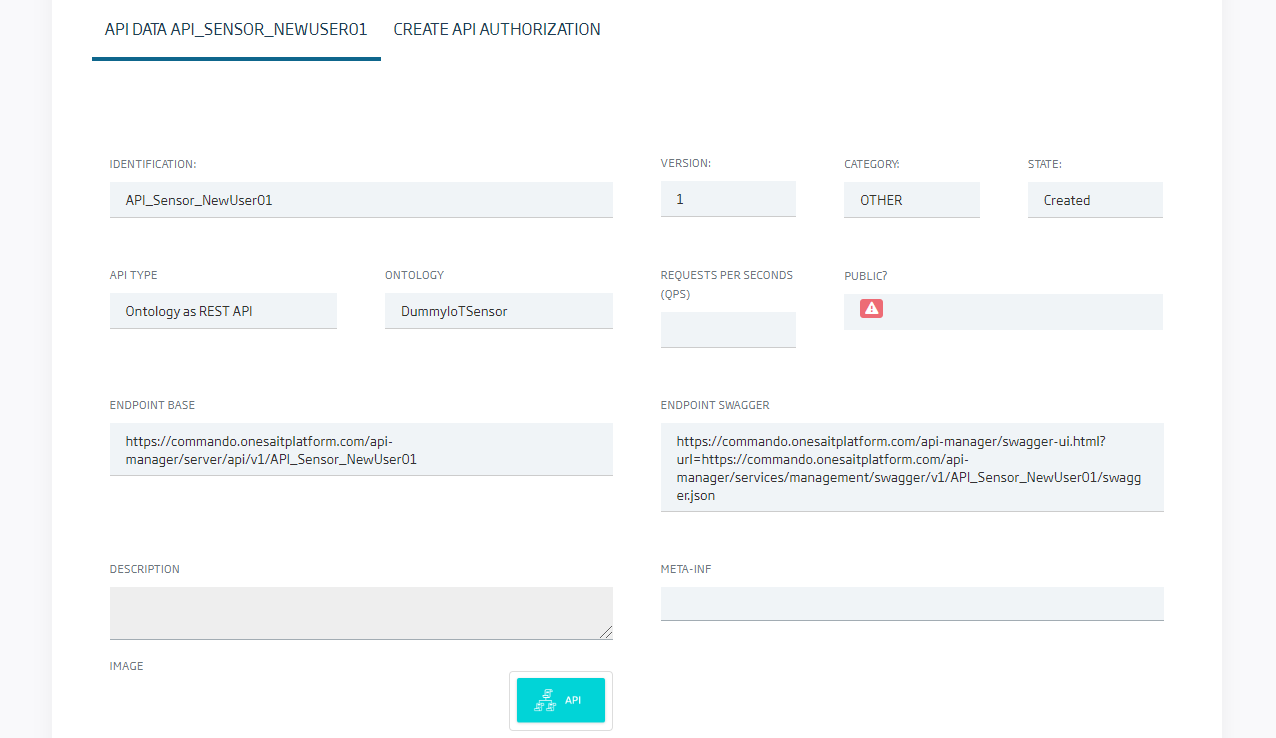
When we have our finished API, then we can change its state. To do that, in the list of APIs, click the Development button:

Invoking the REST API
We return to the option My APIs and we can see the new API:
In order to invoke the API we need a Token. You can access it in the section User Tokens on the upper side. You will see this screen:
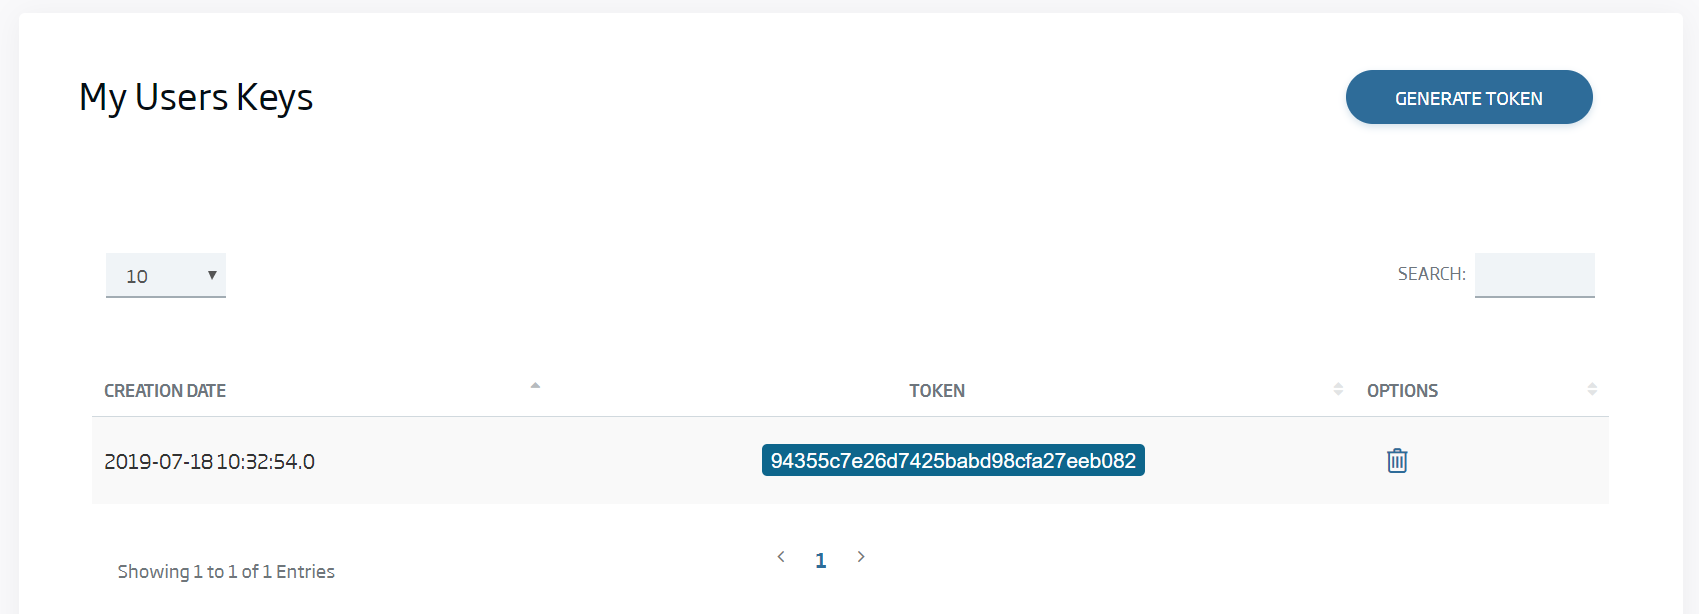
Copy the value of the token (in this case 94355c7e26d7425babd98cfa27eeb082)
To test the API, you can use the integrated Swagger client. To do it, in the list of APIs, select your API and click the SWAGGER button:

This shows you a user interface like this:
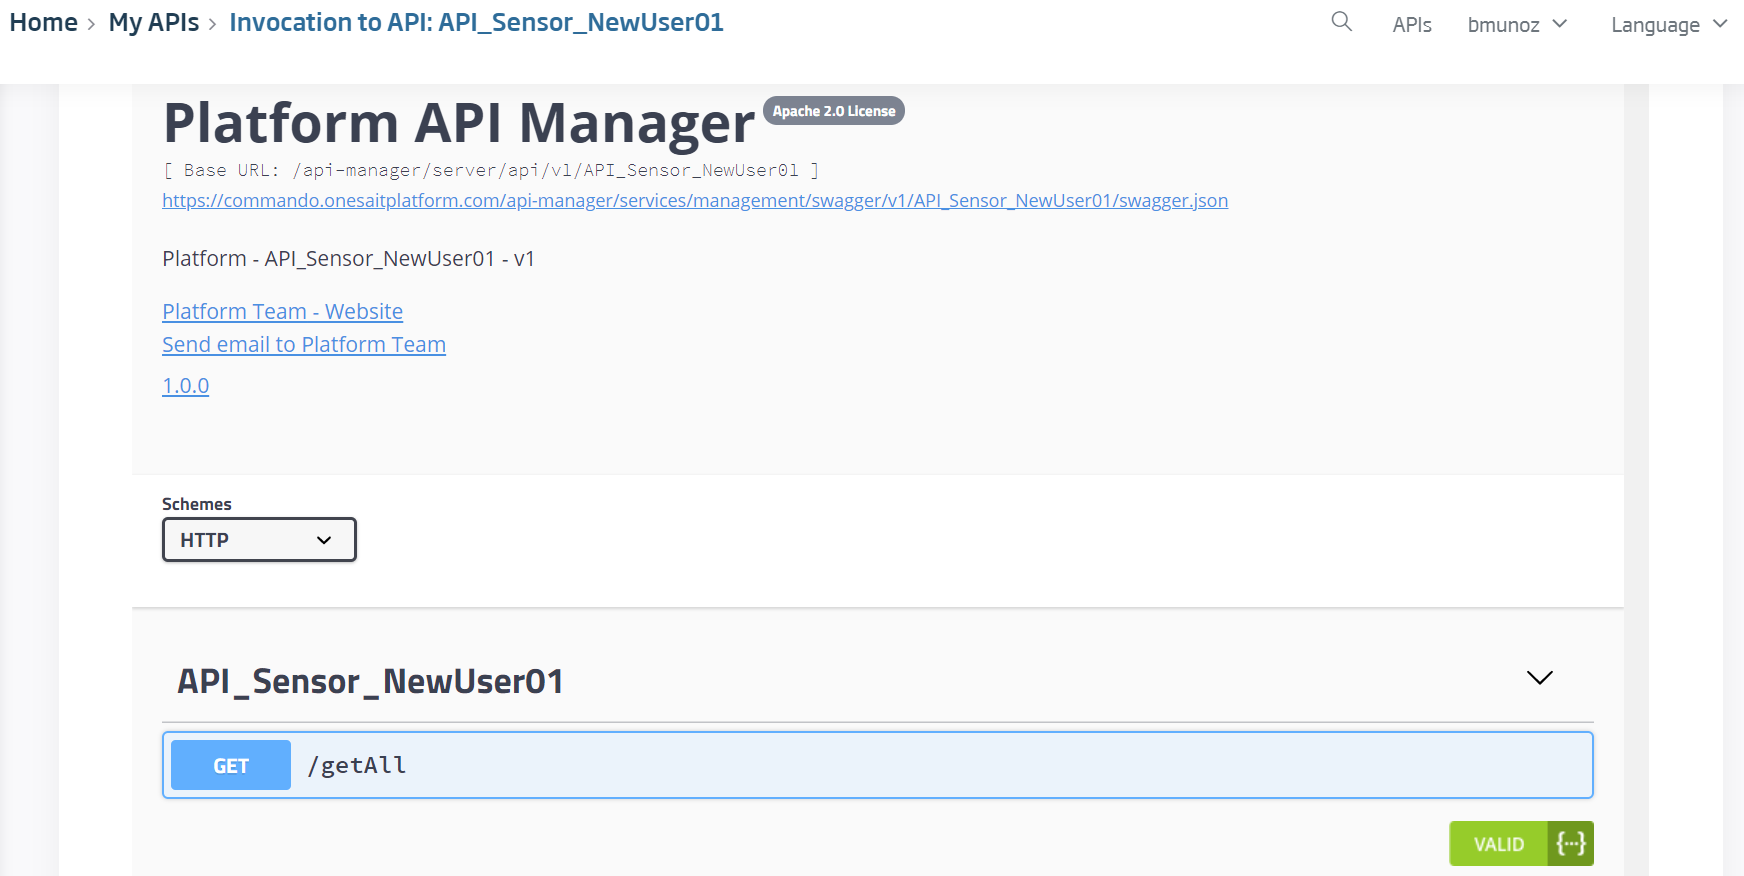
You can click the section /getAll and then the Try It out
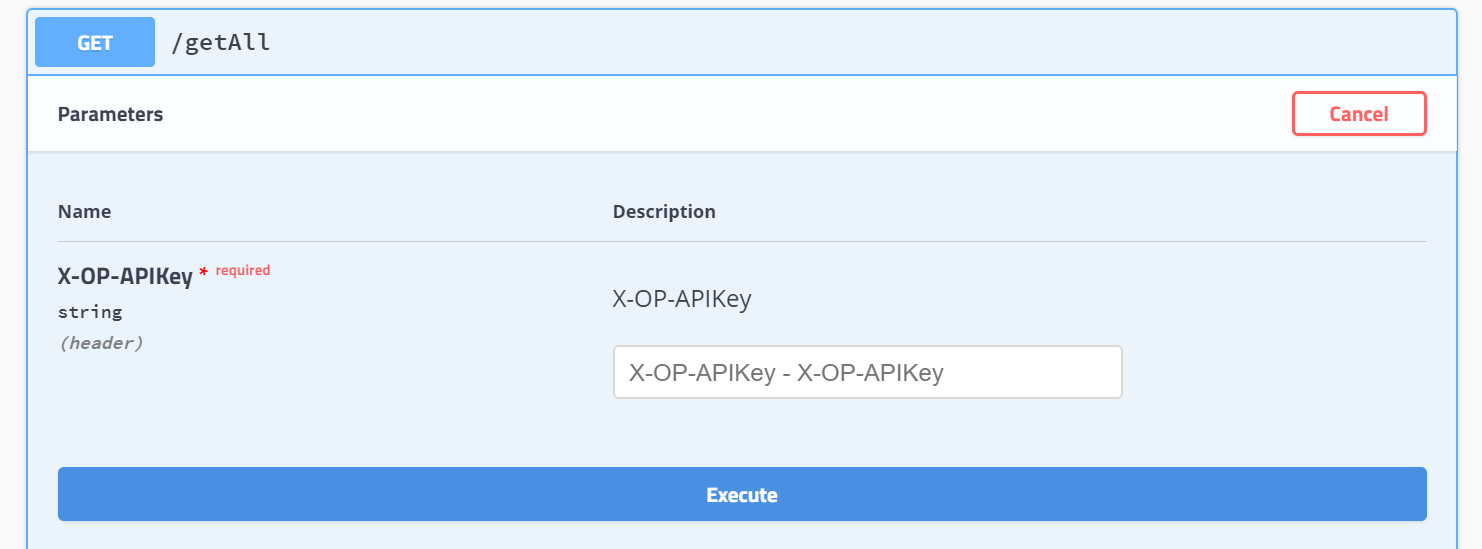
This allows the form to complete data,
In this case, you only have to fill the input X-OP-APIKey with the UserToken (94355c7e26d7425babd98cfa27eeb082).
Now click the Execute button.
The same test can be done with an external REST client, for instance Postman.
This is done by including, in the header of the HTTP requests, one parameter with key X-OP-APIKey and the token as value.
![]()
(c) 2020 Indra Soluciones Tecnologías de la Información, S.L.U.